Graphing Taylor Polynomials

The eighth in the Graphing Calculator / Technology series

Here are some hints for graphing Taylor polynomials using technology. (The illustrations are made using a TI-8x calculator. The ideas are the same on other graphing calculators; the syntax may be slightly different.)

Each successive term of a Taylor polynomial consists of all the previous terms plus one new term. To show students how Taylor polynomials closely approximate a function (in the interval of convergence, of course), enter the function as Y1. Then enter the first term of the polynomial as Y2. Enter the next polynomial as Y3 = Y2 + the second term; enter the next as y4 = Y3 + the next term, and so on.

The example is the McLaurin series for sin(x) centered at the origin:

\displaystyle \sin \left( x \right)=x-\frac{{{x}^{3}}}{3!}+\frac{{{x}^{5}}}{5!}+\cdots +\frac{{{(-1)}^{2n-1}}{{x}^{2n-1}}}{\left( 2n-1 \right)!}=\sum\limits_{n=1}^{\infty }{{{\left( -1 \right)}^{n+1}}\frac{{{x}^{2n-1}}}{\left( 2n-1 \right)!}}

Each will graph one at a time. Watching them graph, one at a time, is instructive as well; each curve approximates the sine curve (in black) further and further away from the origin.

series-1

series-2

Another way to graph the polynomials is to enter them as a sequence of sums. The example this time is ln(x) centered at x = 2:

\displaystyle \ln \left( x \right)=\ln \left( 2 \right)+\frac{x-2}{2}-\frac{{{\left( x-2 \right)}^{2}}}{8}+\frac{{{\left( x-2 \right)}^{3}}}{24}+...=\ln \left( 2 \right)+\sum\limits_{n=1}^{\infty }{{{\left( -1 \right)}^{n+1}}\frac{{{\left( x-2 \right)}^{n}}}{{{2}^{n}}n}}

The syntax is seq( series in sigma notation, indexing variable, start value, end value [,step]). Notice from the figure that the indexing variable, K, is above the sigma.

series-4

The individual polynomials graph in the same color (blue); the function is shown in red.

series-3Comparing the two graphs (sin(x) and ln(x)) is a good way to start a discussion about the interval of convergence – ask what is different about the graphs as more polynomials are graphed on each. Notice that unlike the sin(x) series the ln(x) polynomials only come close to the function in a limited interval (0, 4) centered at x = 2.


Desmos is also a good program to use to illustrate Taylor and McLaurin polynomials (as are Geogebra and Winplot). The use of the sliders makes it possible to see the successive polynomials quickly. They also help students see the interval of convergence as higher degree polynomials hug the graph on wider intervals (sin(x)), or stay within the same interval (ln(x)). The Desmos illustration with slider for the sin(x) centered at the origin is here and for ln(x)  centered at x = 2 is here. Study the input on the left side and enter Taylor polynomials for other functions.

The fifth degree Taylor polynomial for sin(x) centered at the origin.The interval of convergence is all real numbers. Each polynomial “hugs” the graph on wider intervals.

The fifth degree Taylor polynomial for ln(x) centered at x = 2. The interval of convergence is 0 < x < 4. The polynomials all leave the graph outside of this interval.


Coming soon

Feb 14th, Geometric Series – Far Out


Advertisement

Differential Equations

Differential Equations 1

The next several posts will cover the fundamentals of the topic of differential equations at least as far as is needed for an AP Calculus course. We will begin at the beginning.

What is a differential equation?

A differential equation is an equation with one or more derivatives in it. It may be very simple such as \displaystyle \frac{dy}{dx}=2x, or more complicated such as \displaystyle \frac{{{d}^{2}}y}{d{{x}^{2}}}+3\frac{dy}{dx}-4y=\cos \left( x \right) or even more complicated.

Why do we need differential equations?

It is often not possible to determine directly a regular function that applies to a real situation. However, we may be able to measure how something is changing with respect to time. The change with respect to time is a derivative and gives us a differential equation. Once in college, as you may remember, there are entire courses devoted to using and solving differential equations. Power series (a BC topic) are often used to approximate or find the solution to a differential equation.

What is the solution to a differential equation?

The solution of a differential equation is not a number. For the first equations we will consider the short answer is that a solution is a function that when substituted into the differential equation along with its derivatives produces a true statement (an identity).

As you may suspect differential equations, at least the easy ones, are solved by integrating. Thus the solution of \frac{dy}{dx}=2x  first appears to be y={{x}^{2}}. But we quickly realize that y={{x}^{2}}+17 and  also y={{x}^{2}}+2\pi  check when substituted into the given equation. In fact any equation with the form y={{x}^{2}}+C, where C is any constant will check. Because of this we first define the general solution of a differential equation as a function with one or more constants that satisfies the given differential equation.

In order to evaluate the constant(s) we are often given an initial condition. An initial condition is the value of the solution function for a particular value of the independent variable, in other words, a point on the solution’s graph. Once the constant is evaluated, we have what’s called a particular solution.

So if the solution of \frac{dy}{dx}=2x contains the point (4, 7), then the particular solution is y={{x}^{2}}-9. A differential equation with an initial condition is called an initial value problem or an IVP.

How do you solve a differential equation?

There is no one method that will let you solve any differential equation. They are not all as simple as the example above. That’s why entire courses are devoted to solving differential equations. AP Calculus students are expected to know only one of the many methods. (This is because there is only time for the briefest introduction of the topic.) The method is called separation of variables. Not all differential equations can be solved by this method; the second example at the top for example requires a much different approach (that is not tested on the AP calculus exams).

To use the method of separation of variables follow these steps:

(1) by multiplying and dividing rewrite, the equation with the x and dx factors on one side and the y and dy factors on the other side.

(2) Then integrate both sides and

(3) Include a constant of integration.

(4) Use the initial condition to evaluate the constant and

(5) Give the particular solution solved for y.

Example 1: For the very simple example we have been using the work looks like this:

Step 1 Separate the variables: dy=2xdx

Steps 2 and 3 Integrate and include the constant of integration. Note that there is a different constant on both sides, but they are immediately combined into one constant that is usually put with the x-terms: y={{x}^{2}}+C

Step 4 Use the initial condition to find C7={{4}^{2}}+C;\quad C=-9

Stem 5 Write the solution by solving for yy={{x}^{2}}-9

Example 2: An average difficulty question. Find the particular solution of the differential equation \displaystyle \frac{dy}{dx}=-\frac{x}{y} such that the point (4, –3) lies on the solution.

Step 1: ydy=-xdx

Step 2 and 3: \displaystyle \frac{1}{2}{{y}^{2}}=-\frac{1}{2}{{x}^{2}}+C  or {{y}^{2}}=-{{x}^{2}}+C.  Multiplying by 2 to simplify things, The constant in the second form is not the same as in the first. However, it is just another constant so it is okay to call it C again.

Step 4: {{(-3)}^{3}}=-{{\left( 4 \right)}^{2}}+C so C=25

Step 5: {{y}^{2}}=-{{x}^{2}}+25 and y=-\sqrt{25-{{x}^{2}}}

Since the solution must be a function it is necessary to solve for y by taking the square root of both sides. The negative sign is chosen because the initial condition requires a negative value for y. The solution is a semi-circle, the bottom half of the full circle.

Example 3: A bit more difficult, but the steps are the same. Find the particular solution of the differential equation \displaystyle \frac{dy}{dx}=\frac{y-1}{{{x}^{2}}} with the initial condition f\left( 2 \right)=0. (From the 2008 AB calculus exam question 5c.)

Step 1:\displaystyle \frac{dy}{y-1}=\frac{dx}{{{x}^{2}}}

Steps 2 and 3: \displaystyle \ln \left| y-1 \right|=-\frac{1}{x}+C

Step 4: When x = 2, y =0  so \displaystyle \ln \left| 0-1 \right|=-\frac{1}{2}+C;\quad C=\frac{1}{2}

Step 5: Solve for y: \displaystyle \ln \left| y-1 \right|=-\frac{1}{x}+\frac{1}{2}

Raise e to the power on each side to remove the natural logarithm. (Students like to call this “E-ing.”)

\displaystyle {{e}^{\ln }}^{\left| y-1 \right|}={{e}^{-\frac{1}{x}+\frac{1}{2}}}

\displaystyle \left| y-1 \right|={{e}^{-\frac{1}{x}+\frac{1}{2}}}

Near the initial point (2, 0) \left( y-1 \right)<0, so \left| y-1 \right|=-\left( y-1 \right)=1-y, so

\displaystyle 1-y={{e}^{-\frac{1}{x}+\frac{1}{2}}}

\displaystyle y=1-{{e}^{-\frac{1}{x}+\frac{1}{2}}}

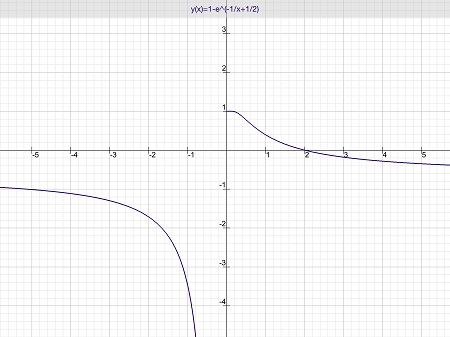
The graph of the solution is the part of the graph shown below for which x>0. See note 2 below:

DEq graph

Two final notes:

  1. The business with the absolute values is important. Students seem to prefer just ignoring the absolute values, but of course you cannot do that. A similar thing occurred in example 2: since you need the square root of one side you must decide, based on the initial condition, whether to use a plus or a minus sign with the radical. Some practice with both these situations is needed.
  2. Since \left( y-1 \right)<0,\quad y<1. In order to make this so, x>0. This is the domain of the solution. Technically, the domain of the particular solution of a differential equation must be an open interval that contains the initial condition, and on which the differential equation is true. Practically, this means that the graph must go through the initial condition point but may not cross an asymptote or contain a point where the function is not defined. The solution in the example is undefined at x = 0. It approaches the y-axis as a vertical asymptote from the left and approaches the point (0,1) from the right. AP students were not required to sort all this out, but a simple graph of the solution will show what’s happening. For more on the domain (which is not really tested) click here.
  3. For you techies: The graph was made on an iPad using an app called Good Grapher Pro. This is an excellent grapher for 2D and 2D graphs that zoom easily by pinching the screen (of course).
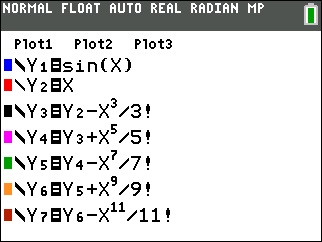
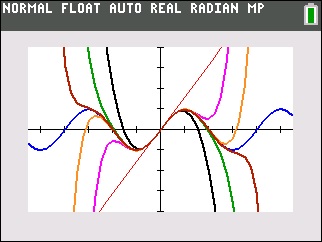
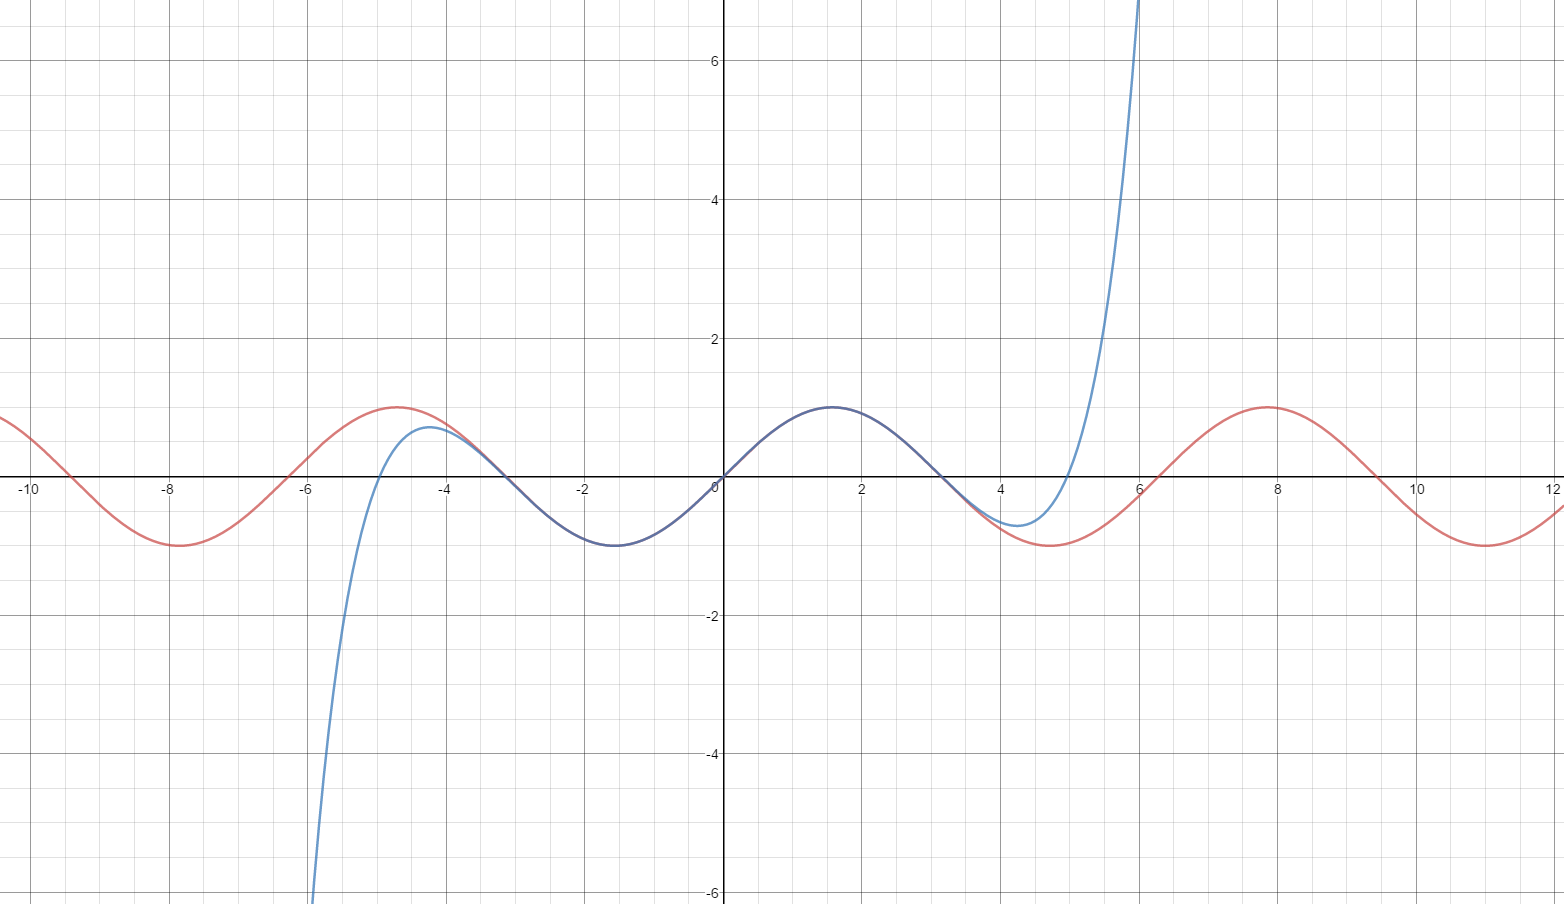
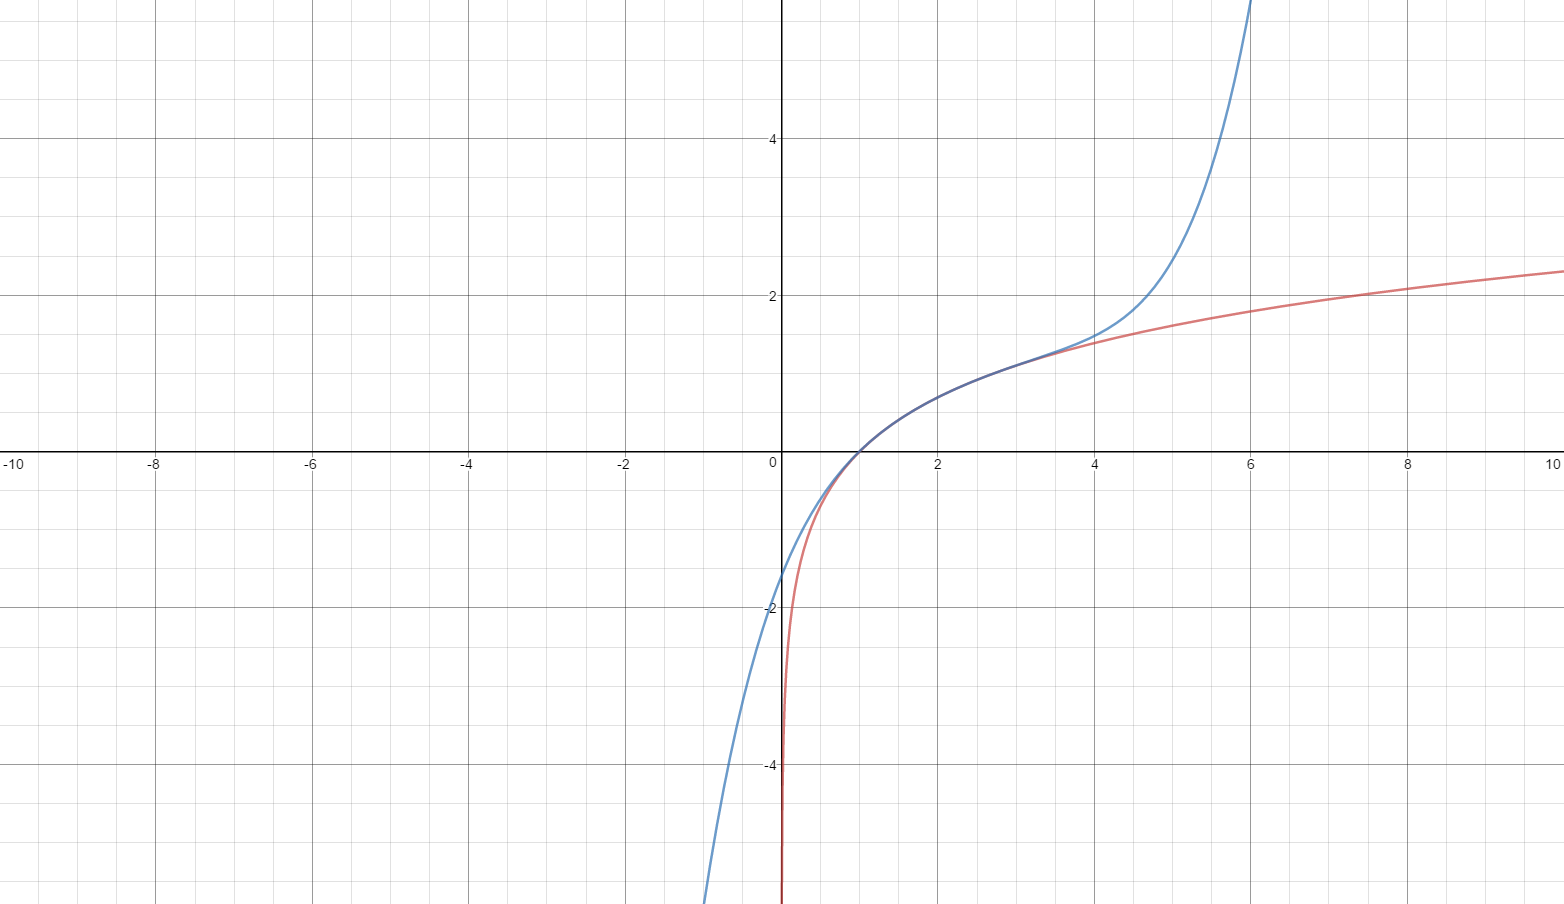
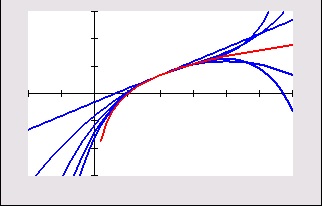
 

Calculators

First some history and then an opinion

I remember buying my first electronic calculator in the late 1960s. It did addition, subtraction, multiplication, and division, and could remember one number. It displayed 8 digits and had a special button that displayed the next eight digits. I remember using those next eight digits never. To buy it I had to drive 40 minutes and spend $70 – expensive even today.

The square root of 743 computed using the algorithm discussed in the post. The third iteration (fourth answer) is correct to 10 digits.

The square root of 743 computed using the algorithm discussed in the post. The third iteration (fourth answer) is correct to 10 digits.

With it I learned an iterative algorithm for finding square roots: guess the root, divide the guess into the number, average the quotient and the guess, repeat using the average as the new guess.  You could do it all without writing anything down. (See the illustration on a modern calculator – accurate to 8 decimals in only 3 iterations (fourth answer), but then I could find the next 8 with the special button.)

Since then, I’ve had lots of calculators of all sorts.

Graphing calculators hit the general market around 1989 or 1990. This was the same time as the “reform calculus” movement. The College Board announced that the AP calculus exams would require graphing calculators in 1995 – five years to get the country ready.

The College Board held intensive training immediately following the reading. These were the TICAP conferences (Technology Intensive Calculus for Advanced Placement). Half the readers were invited for the first year and the other half for the second, then more for the third year.

Casio, Hewlett-Packard, Texas Instruments all gave participants calculators to use take home. Sharpe lent them calculators (and we haven’t heard of Sharpe since). Sample lessons were taught using Hewlett-Packard CAS calculators and then the same lesson was taught using TI-81s. The HP computer algebra system calculators, with far more features but using the far more complicated reverse Polish notation entry system, lost in the completion to the simpler to use, but less sophisticated TI-81s.

The teachers were not all happy. A friend of mine, due to retire in 2-3 years gave up his AP calculus classes early so he would not need to learn the calculators. Others embraced technology. The AP program forced the graphing calculator into high schools where they were used to improve learning and instruction. Yet even today not all high schools have embraced technology.

The calculator makers, especially Texas Instruments, provided print materials, software, workshops and conferences that helped teachers learn how to use graphing calculators in their classes at all levels.

Technology, as a way to teach, learn, and most importantly, do mathematics, caught on big time. And that was and is a good thing.

I think graphing calculators are very quickly becoming obsolete and should be phased out.

Technology has bypassed graphing calculators. Tablet computers, PCs, Macs, iPads, and the like, even smart phones, can do everything graphing calculators can do. They are more versatile. The larger screens are easier to see and can show more information without crowding.

The initial investment may be more than for a graphing calculator, but once purchased the apps are relatively cheap. There are many free apps that not only do computations and graphing, but CAS operations as well. Interactive geometry and statistics apps are also available.

These, along with online textbooks and internet access, put everything students need to learn math literally at their fingertips. Graphs and other results can be easily copied and printed, or pasted into note-taking apps.

One disadvantage is the initial cost for the hardware (but of course many students already have the hardware). The other disadvantage is the ability to communicate and find help both in the room and around the world during tests. Photographing the questions for later use by others is another concern.  I think (hope) it is just a matter of time before this problem can be overcome perhaps with an app that allows access only to the apps the teachers allow for tests.

Technology, like time, marches on.

Socrative

As you may know I have un-retired this year and gone back to high school teaching; I’m filling in for a friend who is on sabbatical. It turns out that this takes a lot of time and so I’ve been writing very little and perhaps neglecting my blog. Today I would like to share a website that I’ve been using this year with both my BC calculus students and my eighth grade Algebra 1 students. It is called Socrative; the URL is www.socrative.com.

The website is similar to a “clicker.” It can be used with a computer, a smart phone, an iPad or other tablet – anything that can connect to the internet. The first time teachers join they get a “room number” that remains theirs from then on. The teacher, working on the teacher side of the site, then prepares quizzes or tests. When the students sign in, they need enter only the teacher’s “room number” and they are ready to go. The teacher starts the quiz, and the students see the questions and answer them on their device. The results are instantly shown on the teacher’s screen.

The questions can be multiple-choice with two (for true-false question) to five choices. Questions may also be open-ended allowing students to enter longer answers. The teacher can supply the correct answer and / or an explanation. Instead of prepared work there is also the option of single-question activities. This is what I use most often. I present the question on the board and the students answer one question at a time on their device.

The results appear on the teacher’s screen which I project for the class. Multiple-choice results are displayed as a bar graph for each choice. Short answers display whatever the student wrote. This allows students to see other forms of the correct answers and spot common mistakes. (Be aware that some students may enter an answer of 2/3 as a forty-place decimal, but that’s not really so bad.)

You have the option to allow the students’ names to appear with their answer. I don’t do that too often. When I do I explain that making fun of someone who made a mistake is a form of bullying and rather they should help whoever got it wrong instead of making fun of them.

Projecting the answers allows the teacher to have immediate feedback – formative assessment. If there are a lot of wrong answers, then you know you have to work more on that concept; if the answers are all or almost all correct you can go on to the next idea.

I used it quite well with eighth grade students in Algebra 1 with all the evaluating of expressions, simplifying, and equation solving in that course and next semester for factoring. I used it recently with my BC calculus classes when we were learning how to write justification for free-response questions. Having a variety of correct and almost correct justifications made for a good discussion and a good class.

Both seniors and eighth graders like doing this and, especially the eighth graders ask to do it daily (which I don’t do).

One of the features I like is that there is a running count of how many students are signed and also how many have answered each question. It helps the teacher know everyone is involved. No one can be daydreaming, doing something else, or playing games on their iPad.

A report with each student’s name and answers can be downloaded at the end of the activity as an e-mail or spreadsheet.

Images, including math symbols, can be included in questions as .gif, .jpg or .png flies, but they are pixellated and appear after the question text (i.e. not as inline equations) and there is no way for students to draw graphs. The website does not work well using Chrome on my PC but is fine in Firefox and Internet Explorer. It works on iPad browsers such as Chrome and Safari. There are also free apps available for smart phones, iPads and tablets.

Local Linearity II

Using Local Linearity to introduce difference quotient and the derivative.

An effective way to introduce difference quotients and derivatives is to write the equation of the “line” you see when you zoom-in on a locally linear function.

First: Ask your class to use their calculator or computer grapher to graph a function, say y = sin(x), or some function they like better.

  1. Ask them to trace over to some point where the graph is “curvy.” (So they will remain on the graph, use the TRACE feature, not the moving cursor.) They do not have to go to, or even be near, the same place.
  2. Then ask them to zoom-in several times until their graph looks like a straight line (locally linear) and save the coordinates of that point as a and b (see the technology hint below).
  3. Then return to the graph and trace one or two clicks left or right to a nearby point on the graph and record the coordinates of that point as c and d.
  4. Write the equation of the line through (a, b) and (c ,d) and enter it in the graphing menu (see technology hint again).
  5. Graph the line. They should see only one “line” because the two graphs are on top of each other.
  6. Re-graph in the standard or Trig window. What do you see now? They should see their original graph with a line that appears tangent to it at the point (a, b).

Next: Discuss what you’ve done, specifically in finding the slope. The value c is a plus a little bit, that is c = a + h. (Or minus a  little bit if h is negative.) So the slope is

\displaystyle \frac{Y1(a+h)-Y1(a)}{(a+h)-a}\text{ or }\frac{f\left( x+h \right)-f\left( x \right)}{h}

and now you are ready to talk about difference quotients and their limit the derivative.

Technology Hints:

When you trace a graph on a calculator the coordinates of the point are written on the bottom of the screen as X and Y, or xc and yc. If you return to the home screen and type X [STO] A and Y [STO] B (or xc [STO] a etc.) the values will be saved to A and B. When you trace to the next point the x and y change, so return to the home screen and save them as C and D.

The line can be written directly in the equation editor in point-slope form by typing Y2 = Y1(A) + (Y1(B)-Y1(A))/(B – A)*(x – A)